Tree Suite - Part 2: Seeing the wood for the trees

General / 19 July 2020


This is the second part in my series of blog posts, where I outline a tree creation tool that I've developed inside of Houdini. The first part is here.

It's been 4 Months since I wrote the first part, and the reason for the delay is simply that I've been too busy finishing the project that spurred me to build the tool in the first place. I'm very excited to share the details of this project, and will be doing so soon, but I can say that all of the screenshots in this post were taken in-game, running at 60fps on rtx2080ti.

All of the foliage in the project larger than a small bush was produced with my Houdini tools, using scans that I collected during a trip to Germany.

One of the reasons that I decided to build my own tools rather than using an existing foliage solution, is because i wanted to be able to produce assets which were extremely detailed up-close, whilst also being able to render enough trees to fill a forest which stretched as far as the eye can see. To achieve this, I needed complete control over every step of the LOD generation process.

Below is an example of  the typical 4-stage tree lods which I generate in my tools.

A typical set of lods is as follows.

  • LOD0: ~ 80,000 tris
  • LOD1: ~40,000 tris (~50%)
  • LOD2 ~ 6500 tris (~0.16%)
  • LOD1 ~ 2 tris (~0.003%)


The Imposter incorrectly reads as 1 tri, this is because numeration starts at 0 instead of 1, meaning that every lod level reads out 1 less tri than it should. There are also still some improvements to be made to ensure that branches silhouettes remain more consistent between lods.

I decided that in order to preserve the apparent density and silhouette of the model from afar, it was important to retain all of the branches and leaf cards right up until the Imposter transition at the end, so there was no loss of volume. Despite this constraint, I was able to achieve huge reductions at each stage, and i did this by taking a completely different route to traditional mesh decimation, and building the system with efficient lodding as a core principle of the tools.

Houdini generates each lod simultaneously using user determined parameters. A tree is built using a simplified node-network, which will be familiar if you use a software like Speedtree.  

Each node has its own optimisation parameters such as number of edge loops, vertical axis, mesh reduction %, curve simplification % and a switch that toggles between polygonal branches, or 2 dimensional planar branches.


Foliage card baking is an optional step that contains its own simplification parameters.

To begin with, the system ensures that whatever leaf card is generated, it never moves outside of the confines of a triangle (or has minimal overlap), this means that the lowest lod is always a single tri, each subsequent lod can have more geometry, which more accurately contains the shape of the card, and reduces overdraw. It is also possible to completely foregoe the card baking process, and use the geometry itself for a cinematic quality asset.

In a future iteration of the toolset, I plan to use the empty space on either side of the main leaf card for 2 additional foliage cards, which will enable a higher degree of variation and visual interest in the end result.

The final, and arguably the most important stage of the optimisation process is the generation of Impostors, which are Octahedral hemisphere impostors. These types of impostors are superior to billboards, since they much more correctly match the source 3d mesh when viewed from different angles, and especially from above, they also require only a single card, which makes them more efficient when rendered in huge numbers.

There are some downsides to Imposters however, such as increased Shader complexity and texture memory requirements. But in this case I found the benefits outweighed the negatives significantly.

The tool does not assume that a tree contains only a single stem, and as a result, it is possible to batch a small stand of trees into a single imposter card, In some cases, the denser canopies produced by multiple overlapping trees actually made them a more suitable candidate for imposter baking, and this step enabled the already enormous number of trees to be multiplied by several factors. 

In total, the landscape contains millions of trees, comprised of over 50 different variations and 5 species. 

Of course, it will be possible to take this even further in future revisions to the toolset, and I am especially excited about the possibilities of UE5 and Nanite. Although currently WPO and masked materials are unsupported (which in some ways I am glad for, since it does not make all of my work redundant), I will be interested to experiment with importing cinematic quality variants of these trees to unreal.

For those interested, you can read more about Octahedral Imposter here: https://www.shaderbits.com/blog/octahedral-impostors 


Basic UE4 Editor Scripting 1 : Creating Objects with Python in an Editor Utility Widget

General / 16 May 2020

As with my previous Houdini blog post, this mini-tutorial will serve as the start of a series about tricks that have empowered my workflow in Unreal. 

Recently I've found myself working on large, repetitive tasks, that would benefit from being automated to some degree. These include

  1. continuously re-importing large tiled terrains, with updated color maps and normal maps. 
  2. renaming/re-organising large numbers of files
  3. Changing settings of static meshes in bulk - for example, setting up LODs, or assigning materials
  4. Creating large numbers of material instances to apply to similar mesh or terrain pieces

For the last few releases, Unreal has had native Python support, and an older feature known as Blutilities, was re-branded to the much less punful Editor Scripting Utilities.

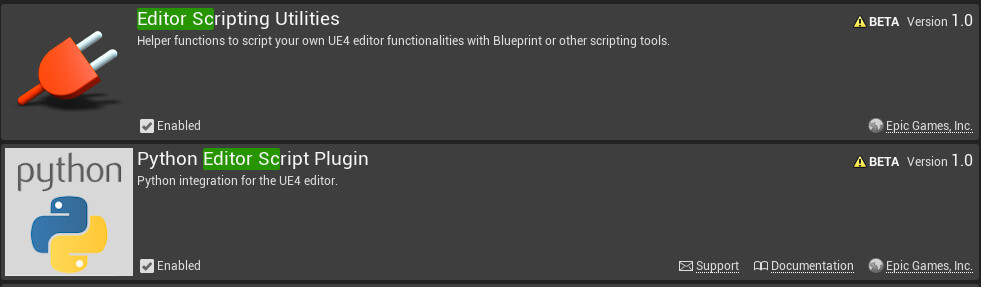
First, make sure that you've got both plugins enabled.

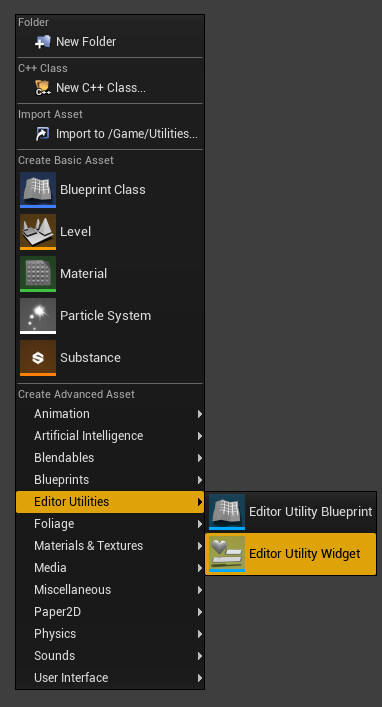
Then create a new Editor Utility Widget.

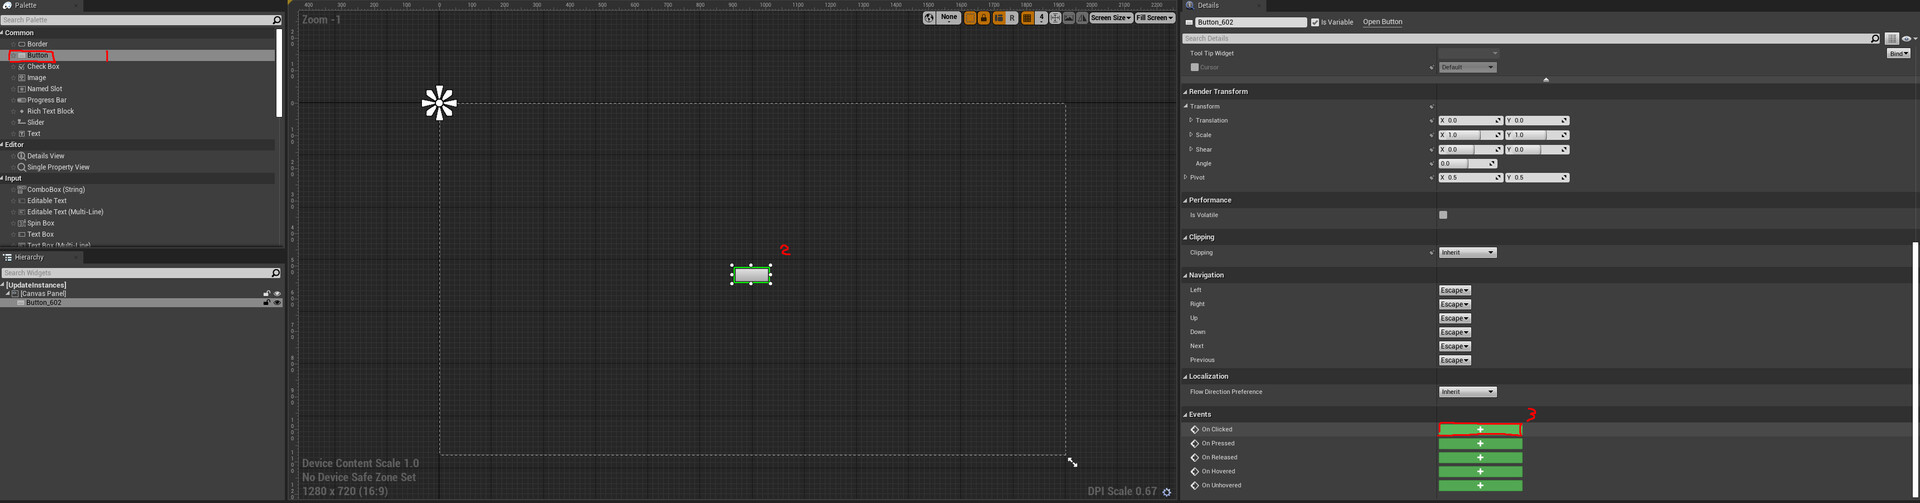
Internally, this widget looks no different to a regular widget. So create a button and bind to it an On Clicked event. I'm going to gloss over a lot of the menu creation, since there are already plenty of tutorials that cover this topic. But rest assured, when you run the widget, there will be a button which is clickable, and exectutes whatever functionality you have assigned to it in the Blueprint Graph.

I'm going to jump straight into the python segment of this tutorial. Search Python in Blueprints contextual search, and you'll find a few nodes, but the most important one, which we'll be focusing on, is Execute Python Command. (In actuality, it's more sensible sibling Advanced). 

Don't let the Advanced moniker fool you, it's far simpler to debug code with the Command Result string.

This node allows you to execute a self-contained block of python, or to call a function that you've written externally. While the latter method is surely very powerful, my main interest at the moment is in being able to handle everything from within editor.

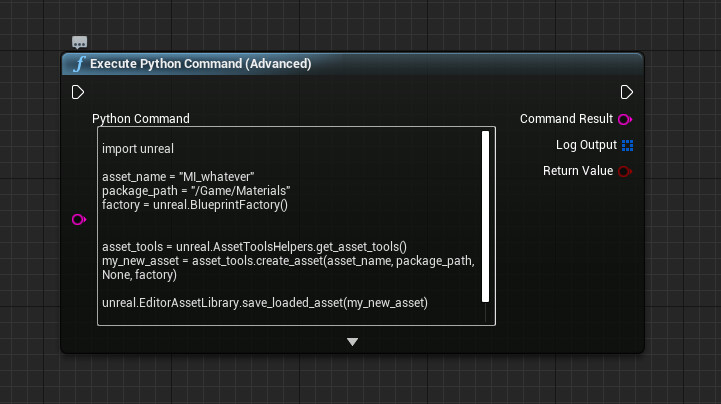
My goal is to automate the creation of Material Instances, and the following code does just that.


The function create_asset, is the most important piece of code here, and if you check out the API reference, you'll see that it takes 4 arguments.
name, path, class and factory.

Unreal accepts None as an argument for Class, and I assume that this is because it is able to infer the class from the factory used.

First I create the variables (asset_name, package_path, factory) which I'm going to use and assign each of them a value. Once the variables are assigned, I run unreal.AssetToolsHelpers.get_asset_tools().create_asset, but first condense the first part of the argument to just be referenced as asset_tools.

I store the the newly created asset as my_new_asset and finally save it with the command unreal.EditorAsetLibrary.save_loaded_asset(my_new_asset).

And Voila! If you wire the out pin of the On Clicked event to the execution pin of Execture Python Command. Load the widget, and click the button. You'll see that a material called MI_Whatever has been created in the folder Content/Materials/.

This is great, and while I can just use the write a little block of python wherever I want to use some of its functionality, it'd be useful to create some reusable scripts. For example, what If I wanted to create a Blueprint, or a level, instead of a static mesh. And what if I wanted to quickly create a bunch of different objects with unique names.

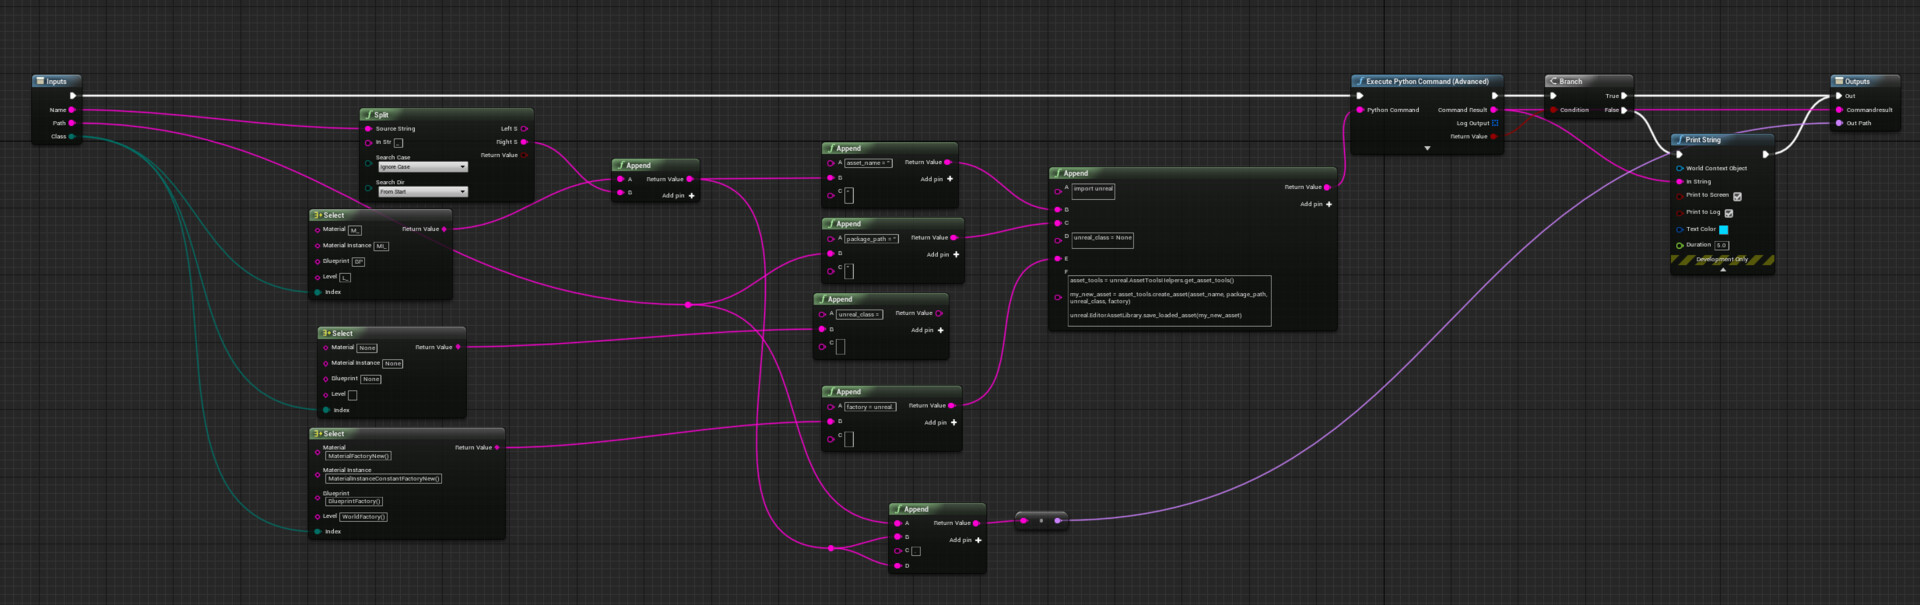
Enter my own custom built Python Create Asset node. This node is actually a macro, created from a combination of Blueprints and Python. It uses an enumerator so the user can select which type of asset is getting made, and instead of writing python, the user just enters the name of the asset and where to create it. So without further ado, lets hop inside.

Here is the inside of the macro, it's dead simple, and basically just appends a bunch of strings to cobble together the python script that executes. The Macro selects between some pre-written snippets of python, and automates the creation of arguments to pass to the create_asset function, which means that in the future, all I need to do to create an object is select the type, give it a name, and set the relative path in the project where I want the asset to be created. 

This is especially useful, because you can create all sorts of logic based off selected assets, actors, and write for-loops within blueprint. It is of course possible to build all of this functionality in Python. But for beginners, like myself, it's helpful to have the ability to save bits of python code that i know I'll be using a over and over again. Also, if you are working on a project with non-programmers, it's a handy way to expose a lot of extra functionality to designers and artists who are sick of repetitive tasks of importing lots of files.

I hope that somebody else finds this helpful, and if anybody has any corrections, or thoughts on a better workflow, I'm all ears. I'll be sure to continue making these little walkthroughs as i learn more.

Thanks for reading!


Quixel Bridge minimum export resolution and batch image processing with IrfanView

General / 07 March 2020

I've wasted a couple of days trying to import megascans plant assets with textures of 512x512 resolution. I expect this guide to be outdated soon, but since it's a frustration that I expect other people are dealing with, and I found a couple of useful tools along the way, I'm making a post in order to

 A: save some steps for anyone else looking to import lots of Megascans assets to unreal

B: Have a handy reference for myself in the future

Bridge has a minimum export resolution of 2K textures at the moment, but this is overkill for most games applications, especially when a lot of the assets are quite small.

It's possible in unreal to set a lodbias for textures so that packaging builds use a lower resolution mip. But it means that you'll be keeping the larger textures on your repository, bloating it unnecessarily.

My quick and dirty solution was to:

1. Import the textures at 2K
2. Use a batch image resizing software, such as IrfanView (which is very lightweight and very fast) to:
          a: create a backup copy of the original 2K texture
          b: resize and overwrite the 2k texture with a 512x512 version
3. Re-import all the textures inside of UE4, which will now pick up the 512 version instead.

IrfanView can pick up all of the images in a directory and all of its subfolders and apply batch operations to all of them. It's a really powerful little tool. 

It even allows you to export a .txt file containing the path of each image, and then you can edit and re-import the text file.

Using Notepad++ mark and bookmark tools, I was then able to use keywords to remove each path that I didn't want to IrfanView to process.


Since there were about 2000 images in total, spread throughout subfolders, and in varying resolutions. Doing this another way could have been incredibly time-consuming.


I hope that this little guide helps somebody else in my position. I'd heartily recommend that people check out IrfanView, it's very easy to get to grips with and incredibly powerful, it even has basic scriptability. Not only that, it's free for non-commercial uses, and relatively cheap for everyone else.


Virtual Texturing and Landscapes in UE4.23

General / 06 October 2019

This is an update that I've been excited about for a long time. I'm so excited about it that I felt the need to nerdily gush about it on the internet and spare my friends who would otherwise have to politely endure a long rant.

You  can watch Epic's official video on the feature in question here: https://www.youtube.com/watch?v=fhoZ2qMAfa4 

So here it is, my first blog post in years! It's basically a TLDR of the video above, with a couple of my own thoughts for novel applications of the feature.

As a software user - not a software developer, my daily life is dependent on the whims of the companies that develop the tools I use. The tools I use amaze me constantly, but from time to time I run up against frustrations and walls. One such wall is the complexity limit of materials in Unreal, which is especially restricting when creating large open-worlds. Landscapes rely on Material layers, the layers must be simple in of themselves, and there must not be too many of them in order for the landscape to be performant.

Sometimes I have fun imagining ways to get around the walls. Often I find that others have already developed solutions. Virtual texturing is a solution to the complexity limit of materials, and it completely changes the game when it comes to Landscapes in Unreal. It is not a new concept, and in my eyes - has been a long time coming.

 It's still a work in progress feature and does not fully support massive worlds yet, but even in it's current form it's immensely powerful. It effectively unshackles the material editor in Unreal and allows you to use it to much greater potential.

Virtual texturing provides a more efficient framework for streaming texture data, and allows you to - in a way - compress an entire material network into a few giant textures - which each represent a material channel. This means that instructions will be capped- no matter how many operations you are running in the material, at runtime it's all the same.

The number of layers that you use is no longer relevant, tiling can be eliminated entirely and advanced procedural layer masks using analytical techniques become viable - for example, occlusion calculations, slope detection, and curvature detection. Texture coordinates can even be warped using flow-maps to create the appearance of complex structures like river banks and sand dunes, with no additional run-time cost.

And lets not forget that meshes and decals can be projected directly onto the texture as well, finally solving roads, and enabling a "splatter gun" approach to landscape texturing. What's more - meshes (such as rocks) can read directly from the landscape texture too, which will have interesting applications, including improved blending between assets, as seen in Dice games. 

Once the resolution limit is increased and there is support for additional channels (I'm looking at you - displacement), then we'll begin to see even greater things.

This update is a true revolution for environment artists using Unreal, and will help us to push the complexity and detail of our virtual worlds to the next level.

I have the good fortune of working on a project that is perfect for putting these new tools to the test, and I hope to share the results in the next few months.